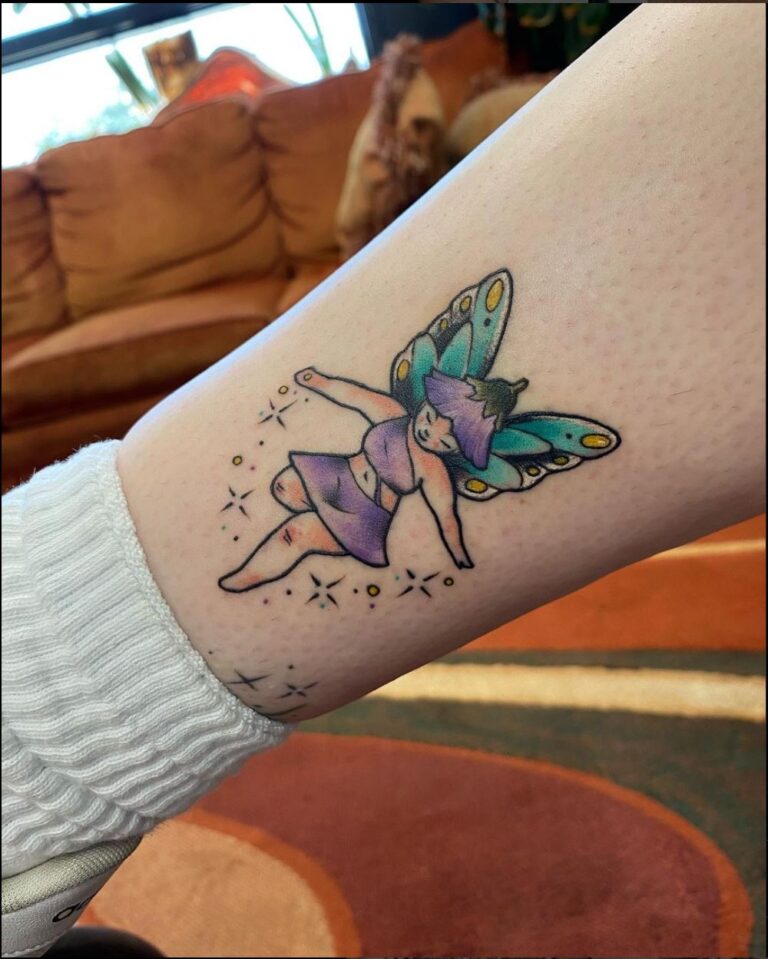
Tuesday, September 15, 2020

Seth Apter Wow Embossing + StencilGirl Blog Hop!


Hi everyone! Welcome to the StencilGirl + Seth Apter WOW! Embossing Powder blog hop! You are about to be super duper inspired by all the amazing things you can do with all these fabulous products! 

First things first, there is a GIVEAWAY!

A $35 Gift Certificate to StencilGirl® Products,
a $35 Gift Certificate to Seth Apter’s Shop
AND a $25 Gift Certificate to Wow!

Enter to win by leaving a comments here on my blog.
Then be sure to visit the other blogs in the hop and comment to win.
The more blogs you comment on, the more chances you have to WIN!
Three winners will be chosen at random from all blog comments!
(One comment per blog please.)


You have until Wednesday, September 23rd at 11:59PM Central Time to leave your comments.
Winners will be announced on Thursday, September 24th.


Here is our amazing Line Up -

Jaine - http://www.basementstudio.lu/?p=2065

Riikka - https://paperiliitin.blogspot.com/2020/09/seth-apter-hop.html

Heather - https://heathermitchelldesign.wordpress.com/2020/08/21/stencilgirl-wow-blog-hop/

Carisa - TBA

Amber - TBA

Jo - https://joherbertsite.wordpress.com/?p=5670


Now for the projects I created today. Be sure to scroll all the way down to view my process video or just CLICK HERE.


Now for my projects, I created two journal pages for you using these products today. The Seth Apter Trios from Wow! Embossing Powders are one of my favorites that I reach for over and over again. First up, is this page using cool tones from the Cosmic Trio. I love the blue tones in this set. Some of the stencils I used are Hash Marks and Soulful Scribbles.


This page is a little more out of my comfort zone using warm color tones however I love the end result. The Metalz Trio is amazing with these colors. I've used the Text and Texture Discovery stencil on both these pages in completely different ways.


Thursday, July 23, 2020

Slimline Card with Brutus Monroe Stencils


Hi friends! I have a new video this week over on the Brutus Monroe YouTube channel. This week's challenge to the Inspiration Team was all about creating Slimline Cards. You'll find Slimline cards on the Brutus Monroe blog, Instagram and YouTube channel this week! Be sure to check it out all week.


You can see the entire process video below but I started by ink blending my background with one of the brand new Slimline stencils. Full list of supplies used below. I used a variety of surface ink colors from Pink and Main. I also got to try out the brand new blending brushes from The Rabbit Hole Designs. I'll go into more detail on them in a future video but lets just say - LOVE!


I used the new Mermaid skin paper to frame my card panel. I love things that color shift and just had to have this paper. It's easy to cut, die cut and layer.  I love the way it shifts from a green to a purple.


You can check out the entire process video below or head over the the Brutus Monroe youtube channel! I had a lot of fun making this card. Ink blending has become one of my favorite things in Cardmaking.


Thank you so much for stopping by today! 

I have started including affiliate links for supplies used in my videos when possible. Using the links when you see something you like helps me with a teeny tiny kickback without changing the price for you at all. It's an easy way for you to support my art and my channel so I can continue to create good content for you. Thank you so much!

SUPPLIES:

Friday, May 22, 2020

2020 Spring | Summer Coffee Lovers Blog Hop


Hi friends! I am so excited to be participating in this very popular blog hop this year! When I was asked by Wow! Embossing if I would like to join in the fun, I couldn't resist. I had just picked up this awesome stamp set from Concord & 9th and knew I wanted to use it just for this. I am very sad I don't have a video for you like I had planned. For some reason, I was hitting stop on my phone every time I thought I was recording and record when I was doing absolutely nothing! LOL So that was a bust. Hopefully you will enjoy these pictures as I attempt to walk you through what I did. Maybe I'll steal away a moment this weekend to go live on my YouTube channel to share the making of this card...if that would interested you, please leave me a comment here! But first...

Wow! Embossing is super excited to play along AND more excited to announce they have a $25 gift card as a super sponsor prize up for grabs for this hop. 
This hops runs from Friday, May 22, 2020 - Friday, May 29, 2020
Please visit the coffee lovers blog hop direct link - http://coffeelovingcardmakers.com/13360
for the full sponsor line up. Winners will also be announced over on their blog.


Coffee...it's what I look forward to most in getting out of bed each morning! Are you with me on this? I have a new favorite - The Donut Shop Coconut Mocha is my ultimate cup of Joe right now. I freaking love it. Have you tried it? If you love coconut and chocolate. Mmm, hmm, need I say more? So, for my card I was really intrigued by the Concord & 9th Turnabout stamps. I received one in my goody bag from the Unstoppable Retreat I taught at in February and then I bought like 5 more. Surprised to find out this is the first time using them? They are really a lot easier than you think. Just follow the guide and you're good to go. I got a teensy bit of overlay since you have to remove your card stock from the paper to emboss but I still love the look - and it's pretty cool to get all the different embossing colors to create your own textured pattern paper!


I love the coordinating dies with this set and had to create a big ole' teal cup of coffee for my sentiment to rest on. I embossed that as well with the Weathered Gold Wow! Embossing powder. In fact all the powders I used today on my card come from the Seth Apter Metalz Trio - I love this trio, in fact I love all the trios because as you can see, they are all beautifully coordinated. For the pop of teal in my card, I used Sea of Tranquility from the Seth Apter Cosmic Trio. Another gorgeous set.

Well, I don't want to keep you so for the next stop on the hop, please visit the Wow! Embossing Blog for more details if you happened on my post today. Thank you so much for stopping by! 

Also, don't forget, because I'm part of the Wow! Embossing Design Team, you get 10% off your purchase from either the USA or UK websites! Wow! is diligently working to the best of their ability to continue to make our favorite products and ship them to you safely and quickly during these difficult times. At checkout just enter my code: wowdtcz

I have started including affiliate links for all the supplies used in my videos here. Using the links when you see something you like helps me with a teeny tiny kickback without changing the price for you at all. It's an easy way for you to support my art and my channel so I can continue to create good content for you. Thank you so much!

SUPPLIES:

Friday, May 8, 2020

Growing In Unity Day 5: Alcohol Ink Lifting


Good morning, friends! I have a small, secret personal obsession with alcohol inks. I love the look of them and how organic every single piece is that I create. They are like watercolors on steroids. When I first saw this stamp from April's Whit Kit, I knew I wanted to use the alcohol lift technique to create some pretty cards. Once I got started, I couldn't stop. I have a rainbow of card backgrounds at my disposal now. 


I can get really carried away once I start adding alcohol inks so I challenged myself to use one color with just a splash of a second color. I am normally not a yellow person but I think with the current climate of the world, I am gravitating toward this warm color because it is a color of happiness. When I looked it up, yellow means joy and hope which I think we ALL need more of right now. I think this is one of the best quotes ever and one I need to remind myself often. Imagine if the caterpillar gave up...how much beauty would be missed!


One of my favorite things about using Alcohol Lift-Ink, is that you get a two for one. Once you lift the ink off the alcohol ink panel, have precut white card stock at the ready so you can immediate get a stamped image from that lifting! It's amazing every single time because no matter how I clean the stamp, I always get unexpected colors when I stamp. That's how I created this second card, stamping the butterflies after I lifted them from the yellow alcohol ink background! Isn't it just gorgeous?! Ahhh, I love it. Don't let that ink you lifted off go to waste!


Creating alcohol inks is very zen and relaxing. Don't just do one at time. Take your Yupo paper and cut several sheets to just keep making backgrounds. I chose a red, yellow, blue and green alcohol ink and cut 4 panels of Yupo when I sat down to create. I ended up with 2 finished cards and all these extra backgrounds that will make creating cards a breeze later on!


The best part of being a GIU Gal is being able to select two winners to receive 25 random stamps from Unity Stamp Co at the end of the week!!! So be sure to leave your comments on each blog post this week, k?


For the past few weekends, I've been participating in a YouTube channel hop and I thought it would be fun to invite you to that. Each week is filled with inspiration from many different artists that I think you will love. My time slot is at 5pm MST and I hope you will be able to join me there as I share how to create these cards using Alcohol Inks and Alcohol Lift Ink live!!

Until tomorrow, do something that makes you happy today!


I have started including affiliate links for all the supplies used in my videos here. Using the links when you see something you like helps me with a teeny tiny kickback without changing the price for you at all. It's an easy way for you to support my art and my channel so I can continue to create good content for you. Thank you so much!

Supplies:

Thursday, May 7, 2020

Growing In Unity Day 4: Gilded Bees


Hi friends! I'm back with Day 4 of my Growing In Unity week. I can't believe it's almost over. I've had so much fun creating each day for these posts. I wish I hadn't packed away all my Unity Stamps but I hope you've enjoyed the different cards I've been creating with the Whit Card Kits. I know I've raved about them all week so I won't bore you with that again. haha Just know that anything you see on my blog or my YouTube channel, I truly love and believe in the company or product - otherwise I wouldn't use it myself! 


So for today's card, I did a little experimenting and found out my idea works! I thought it would look so pretty to add gilding flakes to the bees or butterfly stamps but how to stamp them so that it would stick to  the image? I don't have a glue pad but I do have the new DecoFoil Transfer Gel DUO. It is intended to apply through stencils but I knew it could be used with heat or no heat since it is supposed to dry clear and remain tacky. I decided to apply this to my stamps (since they are red rubber) like I would paint to a stamp in mixed media - using a makeup sponge. Then I stamped it on the card stock. It's by no means perfect...if you want a perfect stamped image, this method probably wouldn't work. But I love the imperfect, messy look of the bees. It's very artsy to me. One very IMPORTANT thing, you must clean your stamps with soap and water right away and do not let the gel medium dry on it - or else they will be ruined. Ok, disclaimer noted. 


I knew I wanted the sentiment to be in gold as well so I pulled out my Wow! Embossing powder in Weathered Gold which is part of a Trio set. I love the mixed gold and black in this powder. It's not a superfine powder either but it embosses sentiments beautifully! Just like in Day 1- I embossed the edges of my pattern paper with the same embossing powder. It's such a fun detail to do...I can't stop.


The best part of being a GIU Gal is being able to select two winners to receive 25 random stamps from Unity Stamp Co at the end of the week!!! So be sure to leave your comments on each blog post this week, k?

I will be live on my YouTube channel at 1p MST today - a little lunchtime crafting with you if you will. I will be recreating both the card from today and yesterday to show you the two different ways I've applied the Gilding Flakes that came in April's card kit. Maybe you've been a little intimidated by that big jar of gold flakes...but I assure you they are fun and easy and make the most stunning impact on your cards! I hope you will be able to join me.


Until tomorrow, do something that makes you happy today!


I have started including affiliate links for all the supplies used in my videos here. Using the links when you see something you like helps me with a teeny tiny kickback without changing the price for you at all. It's an easy way for you to support my art and my channel so I can continue to create good content for you. Thank you so much!

Supplies:

Wednesday, May 6, 2020

Growing In Unity Day 3: Gilded Butterflies


Hello Friends! Welcome to Day 3 of my Growing In Unity week. I apologize for this post going up later than usual. It is a busy week here! Does anyone else wish for more hours in a day or at least MORE energy in the day to get all the things done you want to? I hope I'm not the only one and if you find yourself in the same boat, allow me to say a prayer for you! So for today's card, I could not wait to use the April Whit Card Kit! It finally arrived and these stamps are just gorgeous. It's been awhile since I've played with gilding flakes, too and I forgot how much fun they are...even if I am trailing fairy dust around the house now. haha That stuff gets everywhere but for some reason I don't mind it as much as glitter!


This card evolved from just stamping the butterflies to get a sense of the detail to a full blow card front. I loved how they looked all lined up so much, I went ahead and colored their wings with a very simple yellow and orange color combo and then stamped the 3 small sentiments under each one...I love the message. I am pretty obsessed with the layout. I trimmed the panel down and added some red score tape to the edges to add the gilding flakes. I find this the easiest and simplest way to add gilding flakes to a project. I do have another idea I want to try so again, pray for some energy and time that I can do some experimenting today before tomorrow's post! 


After adhereing the panel on some of the pattern paper in the kit, I added Nuvo Clear Crystal Glaze over the butterflies for added dimension and shine. I forgot how much I love Crystal Glaze over stamped images. It just makes the coloring pop!


The best part of being a GIU Gal is being able to select two winners to receive 25 random stamps from Unity Stamp Co at the end of the week!!! So be sure to leave your comments on each blog post this week, k?

I won't be going live to share the making of this card on my YouTube channel today but I plan to hop on tomorrow morning with you to share this one and tomorrow's card so I hope you will be able to join me for a little coffee and crafting!

Until tomorrow, do something that makes you happy today!


I have started including affiliate links for all the supplies used in my videos here. Using the links when you see something you like helps me with a teeny tiny kickback without changing the price for you at all. It's an easy way for you to support my art and my channel so I can continue to create good content for you. Thank you so much!

Supplies:
BLOG DESIGN BY BELLA LULU INK